Search This Blog

Showing posts with label Photography. Show all posts

Sunday, March 3, 2013

BBHQ March Task - Photo and Video Editing


Hello Lovelies,

This month's BBHQ task is to discuss and share about how us beauty bloggers edit our pictures and/or videos. If you've never heard of BBHQ before, it stands for Beauty Blogger Headquarters and it is an online community group created by Krystal for beauty bloggers to share tips and tricks about what they do to run and maintain their blogs. If you are a beauty blogger or think of starting your own beauty blog, you may want to check out this small community. I enjoy reading tips and ideas from other bloggers because I'm always about improving and in turn I also like sharing my own tips and recommendations because I find it rewarding to be able to help others.

Since I don't do videos at the moment, I will leave that part out but I sure would love to find out more about how others are editing their videos and what program they use as I've been considering doing so for the longest time, lol. What can I say I can be slow, especially if I don't know what the heck I am doing. 
Other than that I can only do so much and once I get in the routine of things, I often just get stuck in that rut.

Warning, this is going to be a long, detailed, but informative post. I've thrown in here as much knowledge and tips that I can think of. 


Programs/Software I have used in the past

For the past 10 years or so I have been strictly using Photoshop 7.0 for all of my image editing needs. Yes, it's a pretty old and outdated Photoshop program but it did get the job done. Never had a problem until about a month ago, I don't know what in the world happened, but I am no longer able to open up the program on my desktop. I'm getting an error message from Windows that the Data Execution Prevention has closed the program. I've googled every possible ways to fix the issue but I've been unsuccessful and gave up. With that said, I had to resort to other options and perhaps it was about time I update my ways of photo editing too. 
Photoshop is a good and powerful image editing program but does require some learning curve. Certain things were pretty easy to figure out but I would have never figured out on my own how to do the more complex and advance editing and had to resort to some online search and YouTube videos. It's definitely not the most user friendly. I would only recommend Photoshop if you are serious about photo editing and want to take your pictures to the next level. Otherwise, if you just prefer to make simple and minor adjustments, there are other less expensive AND free programs that will allow you to do so. 


Programs I am currently using

There are a few programs I have been using since Photoshop 7.0 is no longer compatible with my computer. I've been able to find some pretty decent and FREE online photo editing programs that does not require registration. You just go on the site and upload your pic and start editing, then once you are done, you save it right back into your computer. 

Here is a list of free online programs I found useful...
  1. PicMonkey (http://www.picmonkey.com/)
    • This is probably the one I use the most because it does most of the things that I need and it's very user friendly and great for quick fixes. There are some limitations with the free usage but if you register and pay for Royal membership, which is only $2.75 a month, you definitely get to use everything they offer. Did I mention it's super user friendly? That's why I really like it.
  2. Pixlr Editor (http://pixlr.com/editor/)
    • One thing I like about this program is that the interface is similar to Photoshop 7.0, which I was already familiar with. It's not as great as Photoshop but good enough for the average user.
  3. iPiccy (http://ipiccy.com/)
    • Allows you to do adjustments similar to Pixlr Editor, it just looks different. 
  4. BeFunky (http://www.befunky.com/)
    • I rarely use this program for my blog pictures but I like the photo effect selection, which I find some of them look similar to Instagram.
  5. Fotor (http://www.fotor.com/features/collage.html)
    • This would be the place I go to when I want to make a collage. It's very easy to use. 
I heard that GIMP is also a free photo editing program that you can download and based on some reviews I read, it is supposedly the next best thing to Photoshop. This is something I am considering but so far the programs above have met most of my needs. If you are a GIMP user, please let me know how you like it and if you think I should try it.

Lastly, a program that I use on occasion, is Adobe Lightroom 4.2. I'm still fairly new to the software but so far I've only figured out the basics, lol, and I think it's pretty awesome already. It doesn't have all the bells and whistles that Photoshop does, however, it like it the best for color correcting and enhancement. This thing rocks! This is what you need to have if you want vibrant rich colors in your photos that will blow everyone's mind. Again, since this is an Adobe product, like Photoshop, it does require some learning curve. You gonna have to figure and learn on your own. I occasionally use this program for my portrait pictures and makeup looks to correct my skin color and makeup colors because it's often hard to get it right on camera, even with a DSLR. Surprised? Don't be. You need more than a DSLR camera in order to produce good pictures. 


Here's a screen shot of Lightroom and a before and after view of a picture that I edited. I love how Lightroom allows you to instantly view the side by side difference. The history panel shows you all the adjustments I did to the image. This is handsdown the best color correcting/enhancement software I've tried. It saved a lot of my bad lighting pictures.


Free programs vs. paid programs

From my personal experience, I've definitely had better luck with paid programs. They offer more and better editing tools. 

If you want the basics like, correcting exposure, hues, saturation, crop, resize, adding text, etc...The free online programs can do all that. These will meet the needs of most users.

If you need more advanced editing, crisper pictures, more vibrant colors, adding layers, creating special effect, then the paid programs are the way to go. I would only recommend these if you are particular about how you want your pictures, if photography is a hobby or job, or if you are not completely satisfied with what the free program offers. 

I've been mainly using the free programs I listed above for the past month or so. I think they did meet most of my needs; however, the problem I run into occasionally is jumping between programs just to edit a picture, lol, due to my peculiar needs. Ideally, I would like a program that does all that and I don't have to use 2 or more in order to get the desired result.

So to sum my rant about free and paid programs, the main question you need to ask yourself when considering either one is what are your needs when it comes to photo editing and does that program offer the tools that meet your criteria. Some programs are better are certain thing, yet lacking in other.


My editing process

Pre-processing is just as important as post-processing. The better your images look on camera, the less editing you'll need to do, thus saving you time during post processing. 


A designated area for photography. Whatever you have available or whatever works for you. I am using my beauty station because that's pretty much the only work space that I have available. 

A proper set up. I know some people use a light box but personally for me it's too cumbersome for my work area since I have limited space. I like using table mats as background and I prefer to go with something neutral and not distracting.

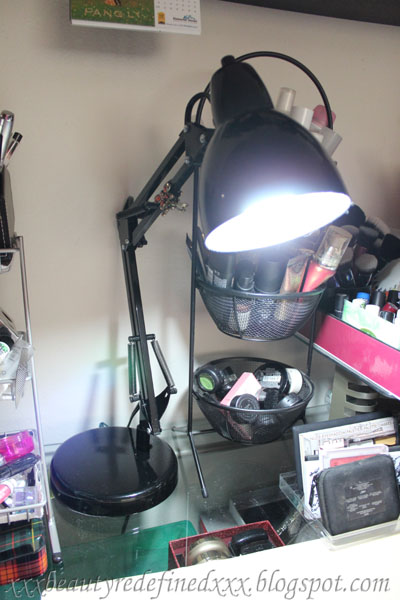
One of the most critical element you need is proper lighting. Natural light is probably one of the best source of light you can get. However, my work area can't benefit from that so I have to resort to artificial light in most of my pictures. You don't need to dish out a lot of money on expensive equipment. I've found that there are many budget friendly alternatives that gets the job done. I am currently using 1 table lamp and 2 clip on lamps. That third light really helped. Another advice I can give you is understanding your light bulb. I've already done a post about it on my photography blog so if that is something you want to know more, you can read it HERE.


Tip: I'm covering my lamps with tracing paper. It helps diffuse the light, which is the same effect you get with a light box without having to use one. This set up is also good for portraits.


Get familiar with your camera. Even point and shoot camera nowadays can take fairly good pictures. They are certainly not as advanced as DSLR cameras but they do produce good result if you understand how they work and how to use them.
The most used setting on my camera is AV, which is aperture value. Occasionally, I'd flip around between AV, P, and Macro. Sometimes I would use my 50mm f/1.4 lens instead of the kit lens. I usually like reaching for it when I take pictures of my nail polish bottles. It seems to produce the best result. Otherwise, I use my kit lens for the majority of my pictures. 


If you don't have a steady hand, I strongly suggest you use a tripod to minimize and prevent blur. If  your camera or lens has anti-shake, use it. Also increasing your shutter speed will minimize blur. 

In spite of all the preparation during pre-processing, sometimes my pictures still need a bit of tune up in post processing.
The most used (and abused) correction I do during post processing is adjusting the exposure, contrast, and colors so that they look as close to real life as possible. Aside from that, I watermark all of my pictures too.
Because I've become efficient at pre-processing, my editing process is very minimal. I edit most of my pictures in less than 2 minutes individually. Five minutes is probably the most time I'd spend editing a picture, those usually involves pictures with my face in them as I spend an additional step correcting skin color and makeup.


The first picture from this post is a perfect example of bad lighting, lol. It was so bad, I had to use Lightroom because the free program couldn't fix it. My skin color looked washed out and ghostly. The image was also under exposed.


The second picture was a lipstick swatch I just posted yesterday. Tip: when taking a picture of lip swatches or close up face makeup, I highly recommend that you do not put the camera in your face. The reason is the closer the lens is to your face the more distorted your facial feature will be. I've seen a few bloggers do this and it is very unflattering because it's blowing your nose, face, lips and eyes out of proportion. Keep the camera at least an arm's length from your face, use the highest pixelation your camera can handle, and then crop out the areas you don't want during post processing so that you don't lose out in quality.
If you don't believe me try it taking picture up close and further and you will see a difference in the way your facial features appears when the lens is up close and when it is further from your face. Your facial feature will look much nicer and less distorted when the lens is further away from your face.


Lastly, this is a nail polish I edited very quickly. It wasn't too bad to begin with but certainly needed a couple tweaks...exposure, color, crop, and watermark. This one was easy. Small adjustment but it makes a difference.

Prior to using a DSLR, I was still able to take fairly good pictures for my blog with a regular point and shoot camera. Of course, they weren't as sharp and defined but they were good still. As I experienced more with the lighting, camera, and software, I've seen a lot of growth in the quality of my pictures as time went by. I always strive to be better at what I do, even now I still feel that there's plenty more room for improvement.

If you made it this far, thanks for reading :). Feel free to ask any questions.


Saturday, December 8, 2012

BBHQ December Task - How Do You Photograph For Your Blog?


I'm a member of the Beauty Blogger Headquarter and for this month's task, we have to share about our blog photographs...What we use, What we do, How we do it, etc...

If you have been following me for a while, you may probably remember that I've shared some tips on how I take my pictures and lighting. Since I've already done a couple posts about those, I will post the link for your reference if you are interested to read more. And before I forget, I just want to announce that I've just started a photography blog so if photography is your cup of tea, feel free to check it out or follow me there as well. It's still very new and I only have a few posts up @ http://pangsphotodiary.blogspot.com/

  • What camera(s) do you use for your blog photography? I have used several camera's for my blog and like most of you, I started with a point and shoot digital cam, but what I am currently using is the Canon Rebel T3i. You can also view my camera on this post My New Camera, First Impression, and Sample Pictures
  • What type of lighting do you use? Natural light, indoor light, studio lamps, etc.? I use a combination of artificial and natural indoor light. What I try to achieve for my readers is getting the most accurate and quality picture possible. One that captures the right color and texture. You can read more about it on this post Photo Lighting Tips.
  • Do you use a lightbox (purchased or diy?)? Nope, I don't use any of that fancy stuff :D but a lightbox has been something I'm considering.
  • Do you use a specific background? Not really, just something neutral or simple that will not interfere with my subject. The last thing you need is a distracting background so the less distracting, the better. Also be careful about the color of  your background as it can alter the color of your subject as well.
  • What does your photographing setup usually looks like? It's pretty simple actually! I'm all about simplicity! You do not need to dish out a lot of money for equipments in order to get good result but I would agree that having all the right gears will help a lot. Your biggest investment should be your camera. I understand that not everyone can afford a DSLR camera but you should try to get the best one that is within your budget so definitely do your research before you buy.
  • What is your top photographing tip for a beginner blogger? Get familiar with your camera's settings and what your camera can do! I cannot stress that enough. Once you understand how they work, you will maximize the quality of your pictures. I guarantee that. For more camera tips, please read this post Camera Tips, Camera Settings, And How To Make The Most of It.
  • For fun: If you could upgrade your photographing equipment today, what would you buy? What I've been thinking of getting is a flash (even though my camera does come with one) and a better editing software. I'm currently using Photoshop 7, which is really old, lol. I just acquired Photoshop Lightroom 4.2. I'm still a little lost at how the interface works but that will be a learning in progress.

This is what my set up look like...Don't laugh cause it's that simple! All I need is my camera, a daylight fluorescent bulb, sometimes I use my mirror as reflector, a white/nude mat (from the dollar store) and that's it!


Sunday, September 30, 2012

Camera Tips, Camera Settings, And How To Make The Most of It


This is my Sony Cyber-shot DSC-WX9


Do you mainly use the auto option on your digital camera or do you also play with your camera settings? One of the most requested and asked questions my readers have asked me is how do I take such nice pictures and if I could do a tutorial. I apologize for the overdue post but here it is, finally. It's going to be a bit technical and lengthy but I'm gonna try to keep it simple as possible. I am not a professional photographer and these are not professional tips but they are things I have used personally to optimize the use of my camera and improve the quality of my pictures.

Digital camera nowadays come packed with a lot of options. They are not just point and shoot no more. To get the most use out of your camera, the first thing you need to do is get familiar with what it can do and how to use it. As much as I know how we all hate going through the user manual handbook, the truth is you will benefit a lot from reading it.

I am currently using a Canon Rebel T3i, which is a DSLR camera but prior to that, I've always used the typical digital cam. The benefit about using a DSLR camera are more setting options, sharper and better image quality, and ability to interchange lenses.
Regardless of whether you are using a DSLR or a digital camera, in order to produce quality photos, the key thing you should know is how to use it. Anyone can take really nice pictures if they know how to utilize the tools and settings that comes with their camera.

Shooting Mode
  • The shooting modes may slightly vary from one brand to another or from one camera to another. 
  • Some of the typical shooting modes are Auto, Scene Selection (portrait, night scene, landscape, macro, etc), and Program.
  • I typically prefer so shoot in Program mode because it allows you to customize certain settings. 
  • My second choice would be Macro mode and you would choose this mode if you are shooting at close range. It will allow your camera to focus on your subject and create a crisper and sharper image. On most camera, this mode has a flower icon. 


ISO
  • ISO is your camera sensitivity to light. Typically you wan to use a smaller ISO if you are taking pictures in bright lighting and increase your ISO when you are in low light. 
  • ISO also controls the Shudder Speed of your camera. The higher the ISO the faster your shudder speed will be. The faster your shudder speed, the less blurry your picture will be. I prefer to use a faster shudder speed for capturing something that is moving.
  • The trade off with using a higher ISO is more "noise" or grainy effect on your pictures. As a result, there will be a loss in quality and sharpness.


Camera Exposure Value
  • This setting will help you control the brightness or darkness of your picture. For instance, if you are taking pictures in bright light or your subject is bright, you'd want a smaller EV and if you are taking pictures in low light or your subject is dark, you may want to increase your EV.

Using The Flash
  • When using the flash, you have to consider the distance between your camera and the subject and adjust the EV and ISO accordingly. If your picture comes out too bright, you'll have to reduce either one or both the ISO and EV. 
  • Tip: when taking pictures outside on a bright sunny day, try it with your flash. You would think that you don't need flash under those condition but I've tried it with flash and sometimes, it turns out so much better. 


Image Size
  • May not be that important but something you should consider if you are often cropping your pictures. There will be a loss in quality and sharpness if you are taking pictures with a smaller size image and then cropping it later. If you know you will eventually crop your pictures, I would suggest you use a larger image size.
So to sum it all, if you know and understand how to manipulate the ISO and EV according to the type of lighting around your subject, you can optimize the outcome of your pictures. Most digital cameras have ISO and EV settings. I cannot recall the last time I saw one that didn't.
My advice is practice! Once you are familiar with how to effectively adjust these settings, you will get the most out of your pictures. I use the EV and ISO a lot (even with my DSLR camera)! They are the next best thing aside from perfect lighting because you can actually control them from your camera.

On a side note, if you missed out or didn't get a change to view my previous post about "Photo Lighting" you can check it out here.

Was this post helpful or not? Were you already using these settings or you weren't even aware that they exist? If you have been using them, how did they work out for you?

Luuux Shared Link

Sunday, September 16, 2012

Photo Lighting Tips


One of the questions that my readers have frequently asked is what type of lighting I use for my blog pictures. Please excuse this long overdue post. I honestly have been meaning to do this a while back but since the main focus of my blog is beauty related, this post has been sitting in the back burner.

Lighting plays a big part in the outcome of your pictures. I try my best to deliver accuracy in terms of colors and textures cause I'm anal like that, lol. They are not perfect but close to home, at least in my opinion.

There are a few factors that can distort the colors of your subjects. I guess these are the main ones. I can't think of anything else at the moment:

  1. Lighting
  2. The type of camera you use
  3. The settings on the camera, such as shutter speed, aperture, ISO, etc...
  4. The settings on your monitor may also play a small part in how the colors of a picture translate into your screen.

Today, I'm only going to go over the "lighting". I will cover the others on a different post. Just so you know, I am not a professional photographer; but I just want to share some tips and tricks that I use and that have worked for me and because this topic has been requested often. 

Currently, for nail polish swatches, what I found works best for me is natural indoor lighting (preferably by the window). I always sit by the window when taking pictures of my nail polish swatches. For the most part, natural indoor lighting gives me the best color accuracy for nail polishes. They are not directly exposed to the light but the light is filtered through the windows and walls, which is perfect for nail swatches.

I don't like using indoor lighting alone for capturing face makeup because the face is a larger area and has more dimension than fingers, which also creates more shadows even when I am standing by the window. For face pictures, I think a combination of natural and artificial light would work best. For smaller subjects that doesn't have a lot of dimension to them, natural indoor lighting is the best.


For other times, when I am not using natural lighting, I use artificial lighting such as this fluorescent light bulb. I bought this bulb such a long time ago that I can't even remember what the packaging looks like. All I know, based on the imprints on the bulb, is that this is made by GE and it's a 10 Watt.
I use artificial lighting a lot. Because I work or am busy during the day, more than often my only time to work on my blog is at night.

Not all fluorescent bulb will emit the same lighting. This is something I have recently discovered, lol. You want one that will emit a cool toned light. Unlike the bulbs that emits warm light, the cool toned lighting will give you a greater color accuracy because it is similar to natural lighting. I believe those are called fluorescent daylight bulbs. Because it mimics natural daylight, this bulb has been my best friend ever since I started blogging. If you are not using one. I highly recommend. Another benefit of using fluorescent light bulb is that it is energy efficient and usually will last you up to 5 years.


There it is, this is the lamp that I always use for my pictures. What's great about this lamp is that it is adjustable so you can manipulate where you want the light to go. With that being said, another useful lighting tip is to use something that will bounce the light in the direction that you want it to go. For instance, I sometimes use my mirror to bounce the light from the lamp. Because the lamp is often behind my subject, which can often create shadows, I use this trick to put the light in front of the subject. There is also light reflectors that you can purchase. They are designed for photographers but you can use anything that will bounce the light if you don't want to spend the money on reflectors. They are actually not that expensive but why not use something you already have, right?


 My makeup station is also my photography studio, lol, in case you didn't know. I like to use a neutral mat (white, black, light beige) for background. You can find those at the dollar store. You may or may not have noticed but certain background colors can actually change the color of your subject. Choosing a neutral background will keep the colors of  your subject more accurate.


See the result? I think it looks pretty cool. This technique is especially good if you are taking pictures in low light and want light to reflect in a specific area. This will also give your pictures more depth and dimension.

Sometimes, I use flash but flash can be tricky if you don't understand how it works and how to control it. I will go over this on the camera setting. Meanwhile if you have not read my post about the DIY flash diffuser, I would recommend that you do. One of the misconception that I read through the comments on Luuux is that some people think that the diffuser is a tool only for a DSLR camera. It isn't! It can be used on any camera that uses flash because the concept is the same...to diffuse the light so that it is evenly distributed. Whether you feel that you need it or not, that is a personal preference but I like to know my options so that I can utilize it when needed.

In a nutshell, this is the type of lighting and tricks that I have used for my blog pictures. It may not be suitable for other types of photography but I think it works well for close up pictures and low light.

If you know and use any other tricks I have not listed, please share! I could always use more tips.


Luuux Shared Link


Thursday, September 6, 2012

DIY Flash Diffuser


To some of you who are a little more advanced in terms of photography, this might be old news, lol, but please bear with me because I am sure there are still people out there who don't know what this is for. Basically, what a flash diffuser does is disperse the light coming from the flash so that your subject doesn't get hit with bright harsh lighting. This is especially very helpful when shooting at close range, which is something I do very often with the pictures for my blog.
 
I like taking pictures with flash. It helps bring out the colors of my makeup and capture the shimmers that you won't see without flash. The problem is sometimes the flash is too harsh or too concentrated on a certain part of the subject so for a more balanced and softer lighting this is when the diffuser comes in handy.
 
There are many ways you can do your own diffuser in order to fit your camera but this is what works for my Rebella.
 
Tools and supplies I used:
 
  • A clear used plastic product packaging that I have no other use for. It's sturdy yet flexible.
  • Scissors
  • Box cutter
  • Clear tape
  • Tracing paper


Directions:

  1. I first cut up the plastic packaging to create a frame. The dimensions are approximately 4" x 2".
  2. With the clear packaging, I also cut out what looks like a handle, which is what I plan to fit and insert into the area where you would attach a flash.
  3. I used two layers of tracing paper and taped it to the screen.
  4. I taped the handle to the screen. Pretty simple but effective. Since I'm not very good with directions, I think the picture should give you a better idea about what I'm talking about.
  5. Once my makeshift flash diffuser is assembled, I just attach it to the camera whenever needed.


And here are some sample pictures so you can see what it looks with and without the flash diffuser. I used the same distance and same settings. See how the flash diffuser eliminates the harsh lighting from the flash. Again, you can customize your DYI flash diffuser to fit your camera. The main idea is to create a barrier that will soften and diffuse the light coming from the flash to balance the light and shadows around your subject. I hope you found this post helpful.

Let me know if you plan on trying this or have tried and how it turned out for you.


Luuux Shared Link
Related Posts Plugin for WordPress, Blogger...