

One of the questions that my readers have frequently asked is what type of lighting I use for my blog pictures. Please excuse this long overdue post. I honestly have been meaning to do this a while back but since the main focus of my blog is beauty related, this post has been sitting in the back burner.
Lighting plays a big part in the outcome of your pictures. I try my best to deliver accuracy in terms of colors and textures cause I'm anal like that, lol. They are not perfect but close to home, at least in my opinion.
There are a few factors that can distort the colors of your subjects. I guess these are the main ones. I can't think of anything else at the moment:
- Lighting
- The type of camera you use
- The settings on the camera, such as shutter speed, aperture, ISO, etc...
- The settings on your monitor may also play a small part in how the colors of a picture translate into your screen.
Today, I'm only going to go over the "lighting". I will cover the others on a different post. Just so you know, I am not a professional photographer; but I just want to share some tips and tricks that I use and that have worked for me and because this topic has been requested often.
Currently, for nail polish swatches, what I found works best for me is natural indoor lighting (preferably by the window). I always sit by the window when taking pictures of my nail polish swatches. For the most part, natural indoor lighting gives me the best color accuracy for nail polishes. They are not directly exposed to the light but the light is filtered through the windows and walls, which is perfect for nail swatches.
I don't like using indoor lighting alone for capturing face makeup because the face is a larger area and has more dimension than fingers, which also creates more shadows even when I am standing by the window. For face pictures, I think a combination of natural and artificial light would work best. For smaller subjects that doesn't have a lot of dimension to them, natural indoor lighting is the best.

For other times, when I am not using natural lighting, I use artificial lighting such as this fluorescent light bulb. I bought this bulb such a long time ago that I can't even remember what the packaging looks like. All I know, based on the imprints on the bulb, is that this is made by GE and it's a 10 Watt.
I use artificial lighting a lot. Because I work or am busy during the day, more than often my only time to work on my blog is at night.
Not all fluorescent bulb will emit the same lighting. This is something I have recently discovered, lol. You want one that will emit a cool toned light. Unlike the bulbs that emits warm light, the cool toned lighting will give you a greater color accuracy because it is similar to natural lighting. I believe those are called fluorescent daylight bulbs. Because it mimics natural daylight, this bulb has been my best friend ever since I started blogging. If you are not using one. I highly recommend. Another benefit of using fluorescent light bulb is that it is energy efficient and usually will last you up to 5 years.
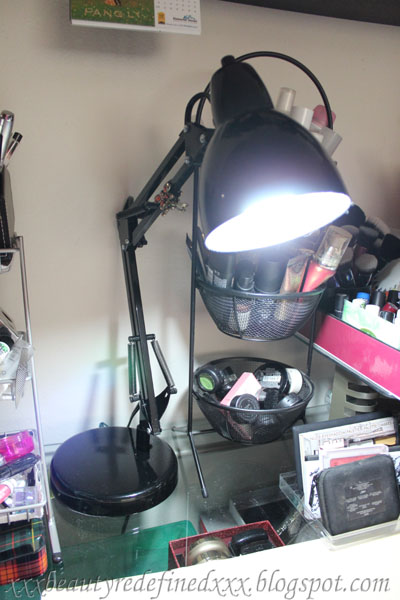
There it is, this is the lamp that I always use for my pictures. What's great about this lamp is that it is adjustable so you can manipulate where you want the light to go. With that being said, another useful lighting tip is to use something that will bounce the light in the direction that you want it to go. For instance, I sometimes use my mirror to bounce the light from the lamp. Because the lamp is often behind my subject, which can often create shadows, I use this trick to put the light in front of the subject. There is also light reflectors that you can purchase. They are designed for photographers but you can use anything that will bounce the light if you don't want to spend the money on reflectors. They are actually not that expensive but why not use something you already have, right?

My makeup station is also my photography studio, lol, in case you didn't know. I like to use a neutral mat (white, black, light beige) for background. You can find those at the dollar store. You may or may not have noticed but certain background colors can actually change the color of your subject. Choosing a neutral background will keep the colors of your subject more accurate.

See the result? I think it looks pretty cool. This technique is especially good if you are taking pictures in low light and want light to reflect in a specific area. This will also give your pictures more depth and dimension.
Sometimes, I use flash but flash can be tricky if you don't understand how it works and how to control it. I will go over this on the camera setting. Meanwhile if you have not read my post about the DIY flash diffuser, I would recommend that you do. One of the misconception that I read through the comments on Luuux is that some people think that the diffuser is a tool only for a DSLR camera. It isn't! It can be used on any camera that uses flash because the concept is the same...to diffuse the light so that it is evenly distributed. Whether you feel that you need it or not, that is a personal preference but I like to know my options so that I can utilize it when needed.
In a nutshell, this is the type of lighting and tricks that I have used for my blog pictures. It may not be suitable for other types of photography but I think it works well for close up pictures and low light.
If you know and use any other tricks I have not listed, please share! I could always use more tips.
Luuux Shared Link

Thanks for the mirror tip! Now I know how to solve my shadow problem when using artificial lighting!
ReplyDeleteThis is helpful. I 'll wait for your next post about the camera settings :)
-Iya
http://iyaboto.blogspot.com/